

How to Photograph the Beach: Tips for Better Photos
How to Photograph the Beach: Tips for Better Photos
The beach is one of the most photogenic places on earth — and one of the most technically challenging to photograph well. The combination of extreme brightness, reflective surfaces, movement, and the specific quality of coastal light means that most beach photos end up either blown out, flat, or simply not capturing what it actually felt like to be there.
Here's how to get better results, whether you're shooting on a phone or a dedicated camera.
Light: The Single Most Important Variable
More than any other location, beach photography is about timing. The quality of light at the beach changes dramatically across the day — and the difference between good light and bad light here is more extreme than almost anywhere else.
Golden hour
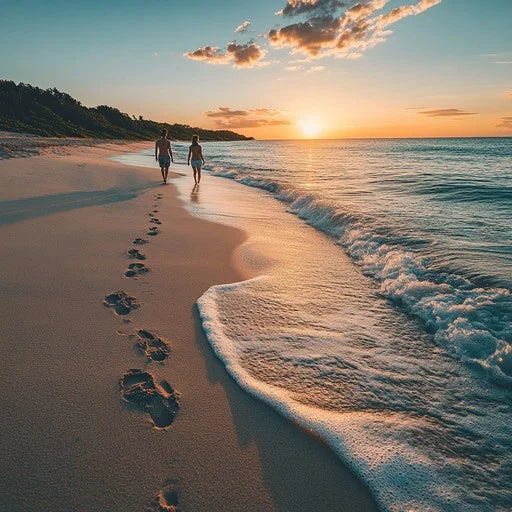
The hour after sunrise and the hour before sunset are the best times to photograph at the beach. The sun is low on the horizon, the light is warm and directional, and the long shadows it creates add depth and dimension to everything it touches. Sand turns amber, water turns gold, and even ordinary scenes become visually interesting.
At the beach specifically, golden hour light does something that midday light can't: it gives texture to the sand (low-angle light rakes across the surface, revealing every ripple) and warmth to the water (the long wavelengths of sunrise and sunset light reflect off the surface rather than absorbing into it).
Blue hour
The 20–30 minutes before sunrise and after sunset — when the sky is a deep blue but the light is still directional — is underutilised at the beach. The sky becomes a gradient from deep blue to the remaining orange near the horizon, and the water reflects the sky colour. Long exposure shots in blue hour can produce extraordinary results.
Midday light
Harsh, overhead, and flat. The midday sun creates strong downward shadows, blows out reflective surfaces, and makes water look less vivid rather than more. For photographing people at the beach, midday is the most unflattering light of the day. Seek shade, shoot into shade rather than against bright sky, or use midday for underwater photography where the high sun penetrates the water best.
Overcast light
Underrated for beach photography. A thin overcast sky acts as a giant softbox — diffusing the light and eliminating harsh shadows. Colours become more saturated and even rather than blown out. Particularly good for photographing people and close detail shots.
Composition: How to Frame a Beach Shot
Use the horizon deliberately
The horizon line is the dominant compositional element in most beach photos. Where you place it matters. A horizon in the centre of the frame creates a static, symmetrical image — sometimes intentional, often not. Placing the horizon in the lower third emphasises the sky; placing it in the upper third emphasises the beach and water. Neither is right or wrong — but it should be a decision, not a default.
One rule: keep the horizon level. A tilted horizon is one of the most distracting errors in beach photography and is easy to correct either in-camera or in editing.
Look for leading lines
The beach has excellent natural leading lines: the waterline curving away from you, a line of footprints in the sand, the edge of a sandbar, the line of breaking waves. Leading lines draw the eye through the frame and give flat beach scenes depth. Walk to different positions and look for lines that direct attention toward your subject.
Get lower than feels natural
Most beach photos are taken from standing height, which produces a flat perspective with lots of undifferentiated sand in the foreground. Get low — knee height, or even lower — and the perspective changes dramatically. Foreground elements (shells, foam, a blanket) become prominent, the water appears to rise toward the camera, and the image gains depth.
Include a human element
A beach photo with a person in it — even a small silhouette in the distance — immediately communicates scale and feeling in a way that a landscape alone doesn't. It also tells a story. The person doesn't need to be the focus; even a figure at the edge of frame transforms the image from a postcard into a scene.
The Technical Side
Exposure: Protect the highlights
Bright sand and reflective water are high-contrast scenes that challenge camera metering. If you expose for the shadows, the bright areas blow out to pure white. The general rule at the beach: expose for the highlights (bright sand, white water, sky) and let the shadows go dark. In editing, you can recover shadows more easily than blown highlights.
On a phone, tap on the brightest area of the frame and the exposure will adjust down. On a camera, use exposure compensation (typically -1 to -2 stops) to protect the bright areas.
Polarising filter
If you shoot with a DSLR or mirrorless camera, a circular polarising filter (CPL) is the single most impactful accessory for beach photography. It cuts the glare from reflective water and wet sand, deepens the blue of the sky, and increases the colour saturation of the water — effects that cannot be replicated in editing. Rotate the filter while looking through the viewfinder until the effect is at its maximum.
Polarising filters for phone cameras (clip-on versions) exist and produce similar effects, though the quality varies.
Protect your gear
Sand and salt are the enemies of camera equipment. A few precautions:
- Keep camera bags closed when not actively shooting
- Never change lenses on a windy beach — sand in a camera body is expensive to fix
- Rinse any equipment that gets salt water on it immediately with fresh water
- Use a UV filter on lenses as a sacrificial layer of protection
For phone photography, a waterproof case is worth the investment at the beach.
Shutter speed for water
The shutter speed you choose determines how water appears in a photo:
- Fast shutter speed (1/500s or faster): Freezes the water — individual drops, frozen foam, a suspended wave. Creates energy and dynamism.
- Slow shutter speed (1/4s to several seconds): Blurs the water — gives the ocean a silky, smooth appearance and reduces visual noise in the scene. Requires a tripod and typically a neutral density filter in bright conditions.
Both approaches are valid and produce very different moods. Experiment with both.
Specific Shots Worth Planning For
Sunrise reflection
On a calm morning, the wet sand in the runoff zone after each wave reflects the sky like a mirror. Position yourself just above the wet sand, shoot low, and the reflection gives you twice the sky for the same composition. Works best in the 10 minutes around sunrise when the sky colour is most intense.
Wave action
Shooting into breaking waves from a low angle with a fast shutter speed creates dynamic images of water in motion. Position yourself safely — know where the wave is going before you commit to the shot — and shoot in burst mode to capture the peak moment.
Silhouette at sunset
A clean silhouette against a coloured sky requires placing your subject between you and the brightest part of the sky and exposing for the sky rather than the subject. The figure goes black; the sky behind stays detailed. Works best with a simple, recognisable shape — a person standing, a surfer holding a board, a couple side by side.
Detail shots
Zoom out to establish where you are; then zoom in to tell the story. Shells, sea foam, a child's footprints, the pattern left by retreating water in the sand, a pair of thongs at the water's edge — detail shots add texture to a set of beach photos and capture things that wide establishing shots miss.
Aerial perspective
Phone cameras with a wide angle, or shooting from a cliff or elevated headland, changes the perspective completely. Looking down at the beach from above reveals patterns in the sand, the geometry of waves, and the colour gradients of shallow water that are invisible from the shore.
Editing: What Actually Helps
Most beach photos benefit from a few specific edits:
- Reduce highlights: Pulls back blown-out sand and sky
- Lift shadows slightly: Opens up the darker areas without flattening the image
- Increase clarity or texture: Adds definition to sand, water texture, and cloud detail
- Boost vibrance (not saturation): Vibrance increases the intensity of muted colours without oversaturating already-vivid ones — more natural result at the beach than straight saturation increases
- Straighten the horizon: Always. Every time.
Phone vs Camera
Modern phones — particularly flagship models — produce excellent beach photography results in good light. The limitations show in challenging conditions: fast movement, low light, high dynamic range scenes where both shadows and highlights matter. In these situations, a dedicated camera with manual controls gives significantly more flexibility.
For most people, the phone you already have, used with the techniques above, will produce dramatically better results than an upgrade to new gear. Light, timing, and composition matter more than camera specifications.
Some of the best beach photos capture not just the scenery but the feeling of a day well spent — the setup, the people, the light at a particular moment. The XO Beach Blanket is designed to look as good in a photo as it performs on the beach — coastal prints, clean lines, and a setup that sits properly under a planted umbrella rather than bunched to one side. Shop the full range at xanto.com.au.
Read more

From surfing and snorkelling to beach picnics and sunrise walks — a guide to making the most of a beach day in Australia, whatever your pace.
Australia's best coastal walks — from the Bondi to Coogee to the Three Capes Track. A guide to the finest beach walks and clifftop hikes by state.